Mittwoch, 6. August 2008

TBFKABM.....


.....("The Band formerly known as Blue Moon")

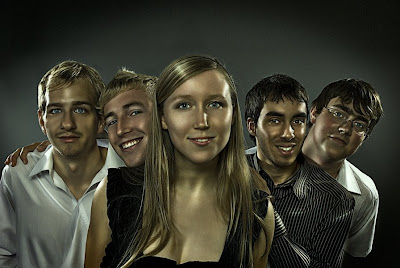
Hallo und herzlich willkommen zu einer neuen Ausgabe meines Foto-Blogs. Alle, die mich kennen wissen, dass ich nebenbei auch noch Musik mache. Diejenigen, die mich nicht kennen, wissen es halt jetzt. Ich glaube, ich war 6, als mich meine Mutter in einem Anfall elterlichen Pflichtbewußtseins ans Klavier drosch. Es folge eine 10-jährige klassische Ausbildung, gefolgt von Jahren des Jammens und Biertrinkens in irgendwelchen Probenkellern. Heute bin ich Bassist in einer Band, ob das ein Schritt nach vorn oder zurück ist, mag der Leser an dieser Stelle bitte selbst entscheiden. 
Auf jeden Fall macht es mir immer großen Spaß, mit anderen Musikern zu spielen und (man ahnt es) sie zu fotografieren. Die Band, die früher mal "Blue Moon" hieß und nun auf der Suche nach einem neuen Namen ist, kenne ich schon sehr lange. Alles nette Typen, vom Schlagzeuger bis zur Frontfrau. Und genau da wollte ich ansetzen. Obwohl alle Bandmitglieder längst ihre Schulzeit hinter sich gelassen haben, haftet der Truppe nach wie vor das Image einer lieben, netten, völlig unschuldigen Schülerband an. Das wollte ich ändern und lud sie mir kurzerhand ins Studio ein; die ersten Ergebnisse will ich Euch natürlich nicht vorenthalten. Zur Technik gibt es eigentlich nicht viel zu sagen. Beleuchtet wurde wieder mit dem von mir heißgeliebten "Triangle"-Setup, ergänzt durch ein 250Ws-Blitzkopf mit Goldreflektor-Schirm von rechts oben (ca. 45° Oberlicht).
In der Postproduction kam nichts wesentlich neues zum Einsatz, deswegen möchte ich an dieser Stelle darauf verzichten und Euch auf meine früheren Posts hinweisen, wo alles relevante aufgeführt sein sollte. Stattdessen erlaubt mir noch eine grundsätzliche Bemerkung: Ich habe natürlich weiterhin vor, komplexere Composings zu gestalten, aber bei diesem Bandshooting entschied ich mich zunächst einmal für Charakter-Portraits; schlicht, einfach, aber dennoch aussagekräftig. Es wird natürlich noch spekatulärere Bilder von dieser Band geben, bis dahin müsst Ihr euch allerdings noch eine Weile gedulden. ;) 

Mehr über diese wirklich tolle Band gibts übrigens hier:


Nun denn, schaut Euch die Bilder an, lasst sie auf Euch wirken und vor allem schreibt mir, ob sie Euch gefallen haben oder nicht und warum und weswegen und überhaupt! *g*

Viele Grüße und allzeit "Gut Licht"....

Euer Alex


.....("The Band formerly known as Blue Moon")

Hi there and welcome to a brand new issue of my photo-blog. Most of my friends know that I´m a musician in my spare time. Those who didn´t know it so far, are briefed concerning it right now! ;) I guess I was 5 when my mother trashed me to the piano, followed by a ten-year-education in classical music. The next episode were years of jammin´ and beer-drinking in several dark rehearsel-rooms with good, loud music. Today I´m a bass guitarist in a band. If this is a step forward oder back you may judge yourself. 
Anyway, it always means a lot of fun to me meeting other musicians for jammin´ and (you guess it) photograph them. The band, who´s former name was "Blue Moon" now searches for a brand new name and a new image as well. I know them for years; all of them nice, kind, people you would commit your money purse to. This is what I wanted to change (and of course the rest rest of the image too;)) and invited them to my studio. Changing there style wasn´t really hard. This Band still carries the image of a cute and conservative school-rock-band, though nearly every member finished high-school years ago! Well, it was time for a kind of "refreshment" and of course I don´t want to deprive the pics to you. 
There is less new to say about the technique. I lightened the setup with my beloved triangle-scheme, supplemented by a 250ws flashhead (set on 1/2 power), equipped with a gold-coated umbrella from right above.
For this shooting I didn´t change my style in postproduction either and herewith refer to my other posts below, where all the relevant things can be looked up. Instead of this please allow me an other comment: Of course there will be more complex composings in the future, but concerning this shooting I decided to start with character-portraits; simple, sober but significant. You may be curious on the next pictures from this really cool band, so stay tuned ;)

For more Information about the band you may take a look at:

So far - so good. Enjoy the portraits of the band and write me, if you like it or not and why and anyway and so on.... ;)

Greets

Alex

Freitag, 6. Juni 2008

Madame Butterfly


Hallo Leute!

Kaum zu glauben, aber wahr - mein letzter Eintrag liegt schon wieder ganze 2 Monate zurück, doch ehe ich mich in Grund und Boden schäme, poste ich lieber ein neues Bild. ;) Selten genug habe ich die Gelegenheit, Modelle in meinem Studio begrüßen zu dürfen. Umso mehr hat es mich gefreut, mit Stephie jemanden eingeladen zu haben, die ebenso den Titel "wandelndes Posing-Lexikon" tragen könnte. Im Schnitt kommen bei meinen Shootings zwischen 200 - 300 Bilder raus, bei Stephie war es mehr als das 3fache! Eines dieser Bilder möchte ich Euch heute im Rahmen meines Blogs vorstellen. 

"Madame Butterfly" markiert für mich eine Art Richtungswechsel im fotografischen Sinne. Weg von der puristischen Studioarbeit von "Model meets Background", hin zu komplexeren Composings. Schmetterlinge digital durch die Gegend fliegen zu lassen, ist nicht wirklich neu, aber selbst ich wollte mich an daran probieren und hier ist meine Interpretation. 
Ursprünglich waren die Schmetterlinge für ein anderes Bild mit Stephie geplant. Da ich es aber nicht erwarten konnte und wissen wollte, ob das Geflatter überhaupt gefällig wirkt, erstellte ich eine Art "Testbild" et voila - this is what came out!
Grundlage war wieder ein Studioshot mit den üblichen Werten (ISO 200, Blende 8 bei 1/125s). Im Gegensatz zu dem zur Zeit sehr populären Triangel-Licht arbeitete ich diesmal mit nur 2 Lichtquellen. Das Hauptlicht kam von einer 120er Octabox (500 Ws, bei 1/4 Leistung), gekontert wurde mit einem 500 Ws Blitzkopf mit Normalreflektor (1/6 Leistung). Um das Gesicht durch den großen Hut weitestgehend schattenfrei zu halten, positionierte ich noch einen Goldreflektor frontal in Hüfthöhe des Modells. Manchmal ist Fotografie eben doch einfacher, als mancher denken mag, obwohl ich nicht abstreiten will, dass komplexere Lichtsets natürlich noch ganz andere Effekte erzielt hätten. Ich habe wieder das Ursprungsbild mitgepostet, so dass man das alles gut nachvollziehen kann.

Neben Beauty-Retusche, Kontraststeigerung, D&B setzte ich natürlich auch diesmal das "Smudging" als Markenzeichen für meine Bearbeitung ein. Da ich schon längst ein Tutorial dazu versprochen hatte, gibts hier und heute endlich den Link dazu *g*:

skeller.ch/ps/beagle_smudge.php

Eine passende Szenerie zu finden, war recht einfach. Durch meine Reisen habe ich so viele Bilder von Hoteldächern, Feldern, Straßen, Plätzen usw., dass es eigentlich für die nächsten 20 Jahre reichen würde. In diesem Fall entschied ich mich für eine Nachtaufnahme, entstanden im April 1998 auf dem Hoteldach des Royal Palace in Singapur, natürlich noch analog, natürlich auf Fuji Astia Diamaterial (nur als Info für die puristisch Interessierten). Eingefügt wurde das Ganze als maskierte Ebene im Modus "Hartes Licht". 
Schwieriger gestaltete es sich, die Schmetterlinge einzubauen. Entstanden sind diese nicht, wie man vielleicht denken mag, auf fotografischem Wege, sondern entstammen einem Projekt zur Eigenwerbung, mit der ich bis 2005 in Erscheinung getreten bin. Die Schmetterlinge wurden demnach alle im Illustrator geboren, auf dem Bild mit Stephie lernten sie fliegen ;) 
Der "Tricky-Part" war also nicht das einfügen, sondern die Transformation, Nachbelichtung und perspektivische Einpassung ins Gesamtbild, denn schließlich sollte es ja noch realistisch wirken. Und genau hier lag der Hase begraben: Schmetterlinge stehen nicht still da, lassen sich auch nicht langsam durch die Lüfte gleiten, sondern sind immer in Bewegung. Um diesen Effekt zu erzielen, legte ich unter jedem Schmetterling eine Kopie-Ebene an, setzte diese auf weiches Licht, wandte den Weichzeichnungsklassiker vom Herrn Gauß an und nahm zusätzlich den Filter "Bewegungsunschärfe", um die Flugbewegung zu simulieren. Jeder mag nachzählen, wieviele Flattermänner im Bild sind, multipliziere dies mal 2 und weiß dann, wieviele Ebenen gerade bei diesem Bild im Spiel waren. ;)

Abschließend kamen noch diverse Farbkorrekturen über maskierte Einstellungsebenen sowie partielles Nachschärfen zum Einsatz. Das ist eigentlich schon "alles". Für Fragen und Anregungen, sachliche und unsachliche Kritik stehe ich Euch natürlich wieder gern zur Verfügung. 

Nachtrag: Ich bitte nochmals um Entschuldigung, dass Ihr so lange auf einen neuen Post warten musstet, doch meine eigentliche Arbeit als Grafiker ließ es einfach nicht anders zu. Ich gelobe Besserung!

Es grüßt Euch

Euer Alex


Hi folks,

believe it or not - it´s been nearly 2 month since I posted something here. Instead of being ashamed i´d rather give an update! I´ve less a chance to invite models to my studio, the more I was pleased to meet Stephie, who´s 2nd name might be "model-posing-encyclopedia". I´m still amazed about her variety. Normally a session brings up to 200 -300 photos; with Stephie it was more then treble. Today I´d like to show you one of these shots.

"Madame Butterfly" marks something like a change concerning my pics. I´m tired of doing these "model-meets-background"-stuff and rather do complex composings in the future, maybe shots, that tell a story. Putting butterflies into a digital enviroment is not pretty new, but I wanted to try it as well and this is my interpretation. In the beginning the butterflies where planned for another pic with Stephie, but I couldn´t hardly await it and wanted to see how they fit in. So I did some kind of test-composing, et voila - this is what came out!
The groundwork was done in my studio again with the usual values (ISO 200, f8 with 1/125s). In contrast to the currently very popular "triangle-lightning" this shot was done with only 2 flashheads. The mainlight came from a 50inch octabox (500ws, reduced to 1/4), countered with a 500ws flashhead with standart-reflector (at 1/6). To avoid shadows on the model´s face I put a gold-reflector right in the front. Sometimes photographic lightning is easier as it looks, though I won´t deny that a more complex lightning had resulted in other effects. I´ve attached the raw shot again so everyone can see the basics.

Beside the beauty-retouche, contrast-increasing and Dodge&Burn I used the Smudging again. This becomes more and more a main part of my style and of course I invite you to take part of it. Now here comes an interesting link:

skeller.ch/ps/beagle_smudge.php

It was easy to find an enviroment that fits. I´ve got thousands of pictures I took during my voyages the last years so that might last for the next 2 decades. In this case I chose a bulb-exposure-shot, taken in april 1998 on the rooftop of the Royal Palace Hotel in Singapore, of course analogue, of course done with my favorite slide film material Fuji Astia (just mentioned for the purists among you). The whole thing was put togheter with the studio shot via a masked layer set on hard light.
Putting in the butterflies wasn´t that easy at all. Some of you might think these are photos as well but I used them for my own portfolio as a graphic designer up to 2005. The butterflies were born therefor in the Illustrator, together with Stephie´s pic they learned to fly. ;) 
The tricky part at this was not the transformation, exposuring or the perspective correction. It all should look like a realistic scenery and thats the snag: butterflies don´t keep still, don´t glide slowly thru the air but are always fast-moving. To create this effect I duplicated EACH butterfly layer and put the copy UNDER the original. Then I used the gaussian blur and added the motion blur as well to simulate a flight-moving. You might count the butterflies on the final pic, duplicate it and then you know, how many layers I used only for this step ;)

Finally I did some color-corrections via several masked layers as well as partial sharpening. Well, thats nearly "all". If you have any questions or incitations, objective or unobjective critique don´t hesitade to contact me via email.

appendix: Sorry again for being a strain on your patience, but I really had to work a lot the past few weeks. I promise to be on the mend!!!

Stay cool! ;)

Alex


Dienstag, 8. April 2008

My private Chainsaw Massacre


Hallo mal wieder!

Es ist Dienstag, es regnet, ich hab verhältnismäßig wenig zu tun - Zeit für ein Update. In letzter Zeit versuche ich gezielt, meinen Bildern mehr Dramatik zu verleihen, sei es durch krasse Farben, ungewohnte Perspektiven oder Accessoires, die man auf hochgestylten Bildern eher weniger sieht. Die Idee, jemanden mit einer Kettensäge zu fotografieren, hatte ich schon länger, quasi eine Neuinterpretation von "Freitag, der 13.". Ursprünglich sollte das so eine Art Schlachthausszenario werden. Aber dann kam alles anders....

Dominik lernte ich durch die Model-Kartei kennen. Es hat nicht lange gedauert, um aus einem adretten Lehramtsstudenten einen blutrünstigen Kettensägenschwinger zu machen. Einerseits lag das an Dominiks extremer Wandlungsfähigkeit, andererseits hat sich wieder mal gezeigt, dass Sympathie ein tragender Bestandteil eines solchen Shootings ist. Danke, Dominik! :)

Zum Bild: Um mehr Dramatik zu erzeugen, hab ich das Ganze vorwiegend rückwärtig (links und rechts, schräg von oben, ca. 45°) mit 2x500 W Köpfen (links Normalreflektor, rechts kleine Softbox) beleuchtet. Aufgehellt wurde frontal mit 250 W und Beauty-Dish. Über Camera-Raw hab ich nur kleinere Farbkorrekturen vorgenommen (weil ich wieder mal vergessen hatte, 6000K an meiner Kamera einzustellen).
Dann das übliche: Kontraststeigerung, Farbkorrekturen über Einstellungsebene, Dodge & Burn sowie partielles Aufhellen über Gradationskurven. 
Ich hatte erst vor, um den Protagonisten eine Art Schlachthaus-Umgebung, oder einen düsteren Keller zu bauen. Dummerweise fand ich in meinem Archiv kein Bild, dass auch nur annähernd perspektivisch konform war. Letztendlich erinnerte ich mich an ein altes Farbdia eines Highways, dass ich 1999 während meines Australientrips nahe des Uluru gemacht hatte; und siehe da: Es war perfekt. Lediglich die Straßenbreite musste ich noch anpassen. Weil mir das noch zu langweilig war, hab ich in den Hintergrund noch das alte Käfer-Wrack gesetzt ;) Eingefügt habe ich den Hintergrund über eine Ebenenmaske und die Wolken dabei nochmals partiell nachbelichtet. Manchmal ist es schon erstaunlich, wie mir mein altes Dunkelkammerwissen dabei zu Gute kommt. *g* Zu Schluss hab ich noch eine Vignette um die Ränder gelegt, um einen Abblendeffekt zu erzielen. Um zu verdeutlichen, wie extrem sich dabei ein schlichtes Studiobild verändern kann, hab ich mal ein Vorher-Nachher-Bild gepostet. Das war eigentlich schon das wesentliche, aber Ihr ahnt vielleicht, dass doch irgendwo der Teufel im Detail steckt und genauso ist es auch. Wer mehr wissen will, mailt mich am besten an. :) 

Beste Grüße
Euer Alex


Hello again!

It´s Tuesday, it´s raining and there is less work to do - time for an update! In the recent past I try to give my pictures a more dramatic look; be that with freaky colors, unusual perspectives or simply crazy ideas you wouldn´t see on advertising photos nowadays. The idea of portraying somebody with a chainsaw was old, let´s say a personal interpretation of "friday the 13th". Originally I wanted to design some kind of slaughterhouse-atmosphere, but then things went different....

I got in touch with Dominik through the "Model-Kartei", a german network for models and photographers. It didn´t take long turning Dominik from a preppy student on lectureship into a bloodthirsty "chainsaw murder" (don´t worry, nobody was harmed ;))! On the one hand it was because Dominik is extremely multifarious, on the other hand it shows that sympathy is a basic part of each shooting, Thank you for that, Dominik!

Concerning the picture: To put in more drama, I did a lightning basically from backwards (left & right, sloped down, 45°) with 2x 500ws flashheads (on the left with standart-reflector, right with small softbox). I brightened up the front with just a 250ws flashhead and a beauty-dish. In Camera-Raw I just did minimal corrections on color-temp (cause again I forgot to set the exposure-mode on "flashlight").
Then the usual stuff: Contrast-increasing, color-corrections via adjustment-layers, dogde&burn-actions as well as partial brightening via gradiation-curves.
First I tried to put everything into a slaughterhouse environment or some kind of dark cellar for giving it a thrilling look. Unfortunately I didn´t find anything in my picture stock that looked like these. Finally I remembered an old slide showing a highway, which I took on my trip to down under near the Uluru, lo and behold: It was suitable. Merely I had to widen the road with the transform tool (strg+"T", or +"T") ;)
To me the environment looked too boring, so I decided to put an old VW beetle into the background. All this was done with a layer-mask, set on "hard-light", so I simply had to erase the parts that didn´t fit. Afterwards I exposed the clouds again to make it more dramatic. Sometimes it´s amazing how my old knowledge on conventionel darkroom work helps me in digital photography. Finally I put a vignette over all to simulate an aperture-effect. I posted a before-after-pic as well to show how a normal studio-shot can turn into a surreal composing.
Well, that was all but perhaps you guess the devil is in the details and you´re absolutely right! If you have further questions, just mail me!

Bye for now!
Alex